Some strange silk

You saw Jan’s post about the group silk order our guild did after we had a presentation about silk at a meeting. If not or you need reminding it is here: https://feltingandfiberstudio.com/2022/02/05/group-order-of-sanjo-silk/ I have not seen her silk yet. I hope I get to see it the next time we are together. Perhaps she is hiding it from me, afraid I will try to make off with it after seeing what I got.

I have lots of nice silk so I decided to go the other way, I bought the strange stuff. It will be interesting to have at demos.

I got these Tussa silk cocoons. They aren’t like the regular ones you see. These are from wild silkworms and are much bigger than regular ones. I have never seen them for sale before. This is what the site says about them:

If you think Bombyx cocoons are fascinating, then you’ll be gobsmacked by these. The Tussah silkworm is wild, which means it eats in the wild. The cocoons are harvested from the forests where they feed. They’re huge compared to Bombyx cocoons; each one is about 1 1/2″ (almost 4 cm) long, not including the pedencal stem. This stem, with the ring at the end, is what the silkworm attaches itself to the tree branch with. Each of the cocoons has been cut, and the pupa removed.

tussa silk cocoons tussa silk cocoons

I also got some of this, Kibiso. It might be interesting to use. I am not sure how but we will see. It feels very much like skinny carrier rods if you have seen those or paper. The website says:

100% Silk Kibiso, which is the outer part of the bombyx cocoon, the less refined part. It’s a bit like Excelsior, which is the woody fibre used in Easter baskets, but this is 100% Silk. It’s a nest of fibre, unprocessed, stiff, and lofty. It takes dye spectacularly,


Kibiso Kibiso Kibiso


Last is strangest. they’re 2 thicknesses of the same I am not sure why I got both. The excitement of the moment perhaps.

The finer stuff it says:

This yarn is 100% Silk – Tussah, which has been cajoled into this wonderful yarn. It’s stiff, quirky, and will add lots of texture and personality to your creative pieces. It can be woven and knitted – think about 3-dimensional pieces. Use it along the edge of a knitted piece. Incorporate it into your weaving to add body and texture.

strange silk yarn strange silk yarn strange silk yarn close up


And the thicker one says:

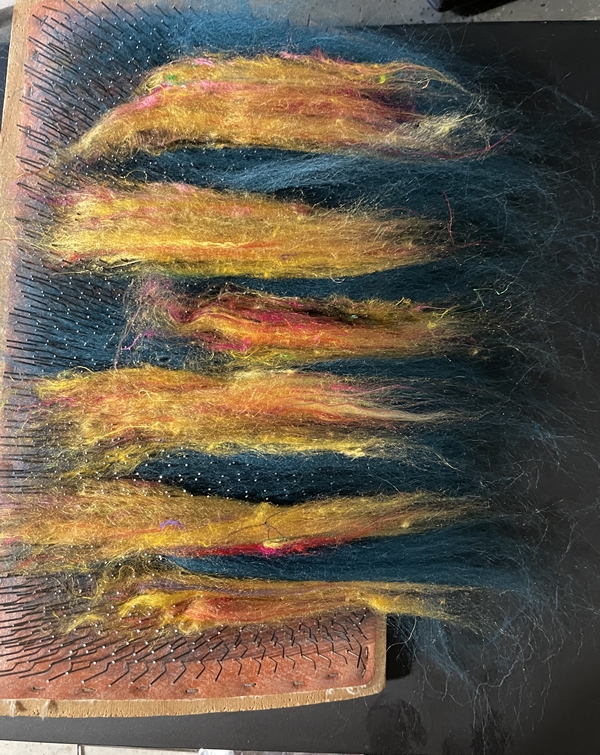
This is the yarn that gets the most attention when seen in person. In a whole display of beautiful, luscious silk yarns, people will zoom in on this one and say, “Wow, what is THIS???” It’s 100% Silk. We call it dreadlocks because that’s exactly what it looks like. It’s thick and glorious. It’s quite firm when you get it, but it softens a bit when soaked in warm water. This is a yarn that requires imagination. Think about 3 dimensions when using this yarn – it’s thick, has loads of body, and has the most intriguing texture. Make baskets with it. Wall hangings. Sculptural pieces. It’s truly magnificent.

super thick strange silk yarn

comarison of thin and thsuper thick strange silk yarn

super thick strange silk yarn close up

“Yarn”., I put that in quotes because it is technically yarn but would not say it was spun. Looking at it I would say someone rolled some wet gummy scrap fibre in some mud or a barnyard and called it done. Calling them dreadlocks is an insult to dreadlocks and calling it glorious or magnificent, is just wrong. Interesting, intriguing, sure but glorious, no. I can’t help feeling like there is someone somewhere havering a great laugh at my expense. I can’t say I blame them. LOL

At some point, I will soak some in hot water and some with hot water and soda ash to see what happens to them. What would you do with them?

Posted in Uncategorized | 1 Comment

Some stitching

Continuing on from stitch camp I have started stitching. I like the pieces with a lot of negative space best but thought I should try to do something outside my natural inclination. So I picked one with mostly yellow but a nice distribution of blue too to start with.

I did a bit of stitching but decided it was too soft and floppy to work well. The stitching was distorting the fabric even though it wasn’t pulled too tight. Another thing I could see, that might happen, is the messy stitching on the backside might show through the white fabric. Iron-on interfacing would solve both problems. I know I have some……somewhere. And the Iron, I have one of those too, I am sure I saw it recently.

I found the iron first, but not before a mouse had found it. The mouse (the one we caught in the fall,) had chewed up the cord. Not a nice chew in half or in one spot but all the way along. You can tell how often Iron because the mouse was caught in the fall, late September or early October. Well, I didn’t like that iron anyway it tended to leak. I will have to buy a new one. Sorry, no picture of the chewed-up cord. I tossed it out on garbage day.


I never know what to buy, so I picked the middle price and the one that says it does not leak on the box. I was tempted by the one with the retractable cord but it was digital with little buttons. I don’t think my iron needs electronics.

Then I found my one-sided iron-on interfacing.


I am less thrilled with the pieces than I was so I picked 3 of the double pieces and one of the singles to use and I will see how that goes. If I start liking them better I can do some more.


I have 2 ironing boards. on is under siege in the spare bedroom and the other one, the small one, disappeared into the packed things. so I had to do it the old-fashioned way with a wool blanket on the table. I used a small piece of sheeting for the ironing cloth.


Stitching with the interfacing is better.


When I did this bit of badly done satin stitch, I noticed the distortion starting. Adding the interfacing and ironing seems to have fixed it.

I don’t know what stitching to do. I know it’s all just an exercise but I still want it to look good. I did some seed stitch and that is probably my favourite so far. I thought it was done but looking at it now it needs something else across the join down near the bottom between the woven circle and the yellow seed stitch I think.


Since I started writing this post I started the second piece. One of the more blue ones. I decided to use some green thread as there are some green spots where the blue and yellow paint crossed.


So far so good. I find it hard to decide where to stitch and what to stitch. I am enjoying it and I hope my stitching will improve with the practice. I find it hard to get my needle to go in or come up exactly where |I want it to. I am using a rounded tip needle. Perhaps a sharp one would work better but I didn’t have one with me. Another thing to look for. It is probably stuck in a piece of foam with some felting needles in a project bag or box.

It wasn’t until I started editing the pictures that I noticed this piece has a parrot in it. It is funny how we don’t see things until we take a picture of them. Do you see it too?

Posted in Uncategorized | Leave a comment

A wool and Felt Study Group

My weavers’ and spinners’ (and felters) guild has had to move online during the pandemic. One way we have been interacting is with Study Groups. For those who don’t know a study group is a bit like a workshop but not. There is a leader who facilitates the learning and does the organizing. It is an interactive learning experience with everyone participating and sharing information.

To that end, I will be running a Wool and Felting Study Group. It is open to anyone anywhere around the world, but be aware of the time difference. Here’s the link. https://www.ovwsg.com/events/event/2200-wet-felted-fibre-study-group/


The group runs for 5 Zoom sessions over 10 weeks and has a dedicated space to share pictures, information and ask questions between sessions. The space will be available for 3 weeks after the last session.

Dates:

    • Wednesday, January 12, 2022, 7:30 pm – 8:30 pm(EST)
    • Wednesday, January 26, 2022, 7:30 pm – 8:30 pm(EST)
    • Wednesday, February 9, 2022, 7:30 pm – 8:30 pm(EST)
  • Wednesday, February 23, 2022, 7:30 pm – 8:30 pm(EST)
  • Wednesday, March 9, 2022, 7:30 pm – 8:30 pm(EST)

Time Zone: North American Eastern Standard Time(EST)= GMT-5

We will be sampling wool and how it felts. We will sample as many kinds of wool as possible and share results online and using a standard form and pictures, so we are all getting the information the same way. We will discuss possible uses for the different wools and outcomes.

We will share pictures (taking and sharing pictures is a requirement) and if everyone agrees to the extra work and expense(fibre and shipping), I will collect and distribute real samples to everyone in the group. If time and resources permit, we will try some non-wool fibres and possibly how adding non-felting fibre affects the felting outcome

The prerequisite for the study group is to be able to layout a simple 10×10 square and feel it and take and share pictures. We will discuss techniques and how they affect the outcome. This study group requires you to participate so everyone can learn and grow, it is all about sharing.


I hope some of you can join us for this fun way to find out about different wools and share with a group of like-minded people.

It would be a great Christmas or whatever you may or may not be celebrating (Happy Friday works for me) present for yourself or a friend. And no shipping fee. Adding some unusual wool would make it even better.


Posted in Uncategorized | 2 Comments

Spinning for For My Felt

I managed this week to get one set of rolags spun and plyed. I decided to do wildflower sari silk first. It’s the mostly yellow one. Here’s the link to making the rolags if you missed it. https://feltingandfiberstudio.com/2021/10/26/sari-silk-and-spinning/

I spun a single first, naturally. It took a little bit to get used to the silk. The silk is much harder to draft but mixed with the wool it wasn’t too bad. You have to accept you are not going to get a really smooth yarn. You are going to get a great texture.

Next, I did what is the most meditative part of spinning for me. I made a center-pull ball by hand. If you are in a hurry or you have lots to do then a ball winder is the way to go. But I really do enjoy this part. I use a little piece of painter’s tape to make sure I don’t lose the center yarn, while I am winding. Do you enjoy doing something that other people seem to dread doing?


Then the fastest part, plying.

It’s interesting that when it was a single I thought it was a bit dull and muddy but after plying it seems to be brighter and shinier. I really like it. It has lots of colour and so much texture. it will be great as an embellishment on my felt.


I haven’t decided if I will make it into a center-pull ball or a skein for storage.

Posted in Uncategorized | 2 Comments

Sari silk and spinning

I ordered some sari silk a while back as part of a larger order from World Of Wool. I am ordering wholesale so I ordered 1 kg of each of the colours I wanted. the first 2 look very similar here but the first has a lot of green and red and the second has quite a lot of black. I had expected the pink one to be much more purple. It is called Royal Robe. Every batch is different, so you are always taking a chance. It would be great if they took new pictures for each batch but I suppose that would be a big hassle for them. And they do warn you so no complaining.

That is a lot of sari silk.

I did make up some small bags of it and sold them on the guild’s Facebook page. I will offer it again soon. I still have lots. I haven’t played with it much at all. So last weekend knowing it would be rainy at the market, so slow and I would be bored, I grabbed some of the silk and a spindle to try spinning it. I brought an older cheaper spindle because I knew I would probably be doing as much dropping as spinning. I was right. It is very short and very frustrating to try to spin, especially since I usually do more of a long draw. I tried for a while then gave up and plied the tiny amount I had spun.

Ta-Da…


I told you it was small. Here is a close up.

It is very pretty and shiny but I will not be spinning more this way.

Next was to try blending some with some wool.

I picked these two shades of merino. I think they are mallard and duck egg. They seem to be the same colour but have different saturations of the dye.

And these 3 sari silks to blend in. Looking now I see I picked the 3 primaries.

First I did the turquoise lagoon. I did a layer of the dark, then the light and then the sari silk. I carded it several times to blend it and then rolled it into a rollag

It is very subtle but I think it will add some shin and interest when I spin it.

Next, I did the Salsa, I did the same thing a layer of each of the wools and then some sari silk

And lastly the wildflower

Now I have to spin them up. They are not the neatest rollags but I think they will work. I will do some recarding if I have to but I hope I don’t have to.

Posted in Experiments, Spinning, Uncategorized | Tagged , | Leave a comment

A new lantern cover and some new backgrounds on different backings.

I did finish the felting part of the 3 pieces I started last time.

First the lantern cover. I am not entirely happy with the way it felted. I was hoping it would be more solid. However, there was so much non-wool fibre it ended up very soft and holey.

It will still work for this application but it wouldn’t stand up to being a scarf. It looks cool just not what I planned. Sometimes that is the way it goes.

The first one is just on the vase the second is the lights turned on and the last is with the lights on in the dark.


The first picture felted up nicely. I used the thicker mostly felted prefelt I have and it is nice and firm after felting. It shrank a little but I was able to pull it back out to 5×7. I am not sure which way up it should go is it land and sea/stormy sky?


Or is it land and sunset sky? what do you think? I haven’t decided on what I will add to the picture now. Maybe some needle felting or some stitching or both.


The next one that wasn’t wet yet in the last blog also worked out very well. I felted it onto a piece from a fulled, woven wool coat. The fabric didn’t shink but the wool attached pretty well.

The embellishments are attached but look to be floating rather than part of it. I think I may rewet it and felt it some more. The embellishment fibres are not very well attached. I like it though.


After writing this I decided the wool was well felted so I would needle felt the embellishments in rather than rewetting it. They lost some of the brightness but I still like it.


I have an experiment to show you next time and maybe if I figure it out, some idea of what I will do with these pieces.

Posted in Demos, Experiments, Resist Felting | Tagged , , | 1 Comment

Felting with coffee pods experiment +

Hi, It’s me again, out of sync. We had a scheduling problem so I have jumped back in and Ruth will be me later.

A while ago I collected some used coffee pods to try doing some felting with. This was inspired by Judit Pócs. She is an incredible felter and has an amazing imagination. https://pocsjuditstudio.hu/home I believe she used them in a  free, felted ring workshop for people that are members of the International Felt makers Association when they had their online conference. I am not a member. Anyway, there were all over Facebook and I wanted to try them out. This is the first attempt.

These are metal pods for a Nespresso machine. I got them by asking on my local buy/sell/give group on Facebook. People with these machines do not throw the pods out they collect them in a supplied bag and then send them back to the company postage paid for recycling. At least that seems less wasteful.

They are pretty and come in two sizes


I had to flatten the pods first. The large domes are much easier to flatten nicely.

I laid out a thickish base and then added to the 2 kinds of pods.


Then another double layer of wool on top.


I felted in the usual way and then cut holes over the disk. I cut the wrong side first, naturally


This is where it starts to go downhill. The texture of the disks makes it hard to rub and heal the cuts. I am not the most patient with this step normally so this was frustrating and didn’t work well.


As a first experiment, this was a good learning experience.

Next time I will mark the top and put a piece of underlay over the pods to make a smoother surface to work on after I cut the holes. That should make it easier to make a better edge. I also think I needed a thicker layer of wool over the pods to get a nicer deeper edge. Maybe just over the pods and not the whole piece. This piece is a good thickness for bag/pouch. Also, as usual, I need to slow down and be patient.

I also made a piece of felt to try out some stitching with the Solvy water-soluble stabilizer. It’s not very exciting to look at and I will probably iron it a little smoother and flatter. I think I will add some needle felting to part of it before using it so I have the 2 textures to try on.

I like figuring out how things are done. I enjoy making samples/experiments much more than I used to. I think it’s all the covid lockdowns and there being no shows. There is not much point in making 20 hats and scarves if you have nowhere to sell them. Have you successfully figured out how to do something you’ve seen online?

Posted in Experiments, Stitching, Uncategorized | Tagged | Leave a comment

Started but not Finished

At the moment I seem to be really squeezed for time. I have managed to start 3 small things

First I wanted to do another vase cover. I used a bat that was made on a blending board. I pealed a thin layer and then filled in the holes. I like the autumn colours.


That is as far as that got.

Next, I wanted a little bigger landscape I could needle felt and stitch on, so cut a 5×7 inch piece of the soft thick prefelt to use.


I wrapped the wool around the piece so there won’t be grey edges.

And that’s as far as that one got. I have it rolled up with the vase cover so they can be rolled at the same time.

Then, oh my I still have a few min. I had some well-fulled wool fabric a friend gave to me. I think it used to be a coat. I cut out a small piece and brushed up one side with my wire dog brush to see if it will stick together well with wet felting. Then added some fibre

The difference is hard to see. the left is the unbrushed side and the right is the brushed side.

I had intended to just add 2 colours and felt it to use for trying out stitching on the new water-soluble stabilizer I ordered. But before I realized it I had made another landscape. Oh well, that’s ok, I will have to try again to make some practice pieces.

That is as far as I got with that one. I will probably wet it and add it to the other roll and then do them all at once. Maybe next week I will have them felted. With this time of year being very busy for me, it makes it hard to get some felting in. I try to get some in every week so I can share with all our friends and followers.

Posted in Art, Experiments, Wet felting | Tagged , | Leave a comment

Some felted lantern covers

A while ago on Facebook someone posted they had made felt covers for lanterns. they had ordered a workshop in a box with everything in it but I like to figure things out myself. They didn’t look too hard to do. I think someone here might have done something similar here too but I don’t remember properly.

I started out thinking I wanted a clear plastic cylinder to use as the base. I couldn’t find anything, except, of course, I could find them with other things inside them. But then I went to the dollar store and found a tall glass vase for only $4. Available trumps ideal every time.

I started out working out the size.

then I made a resist to those numbers and one that was taller.


For the tall one, I was going for a landscape feel, grass, sand, water, sky. The layout is very thin so later the light will show well.


The second one was my granddaughter, Autumn’s choices of colour and sparkle.


The felting was easy and fast as there wasn’t much wool involved.

Here is Autumn’s cover

And with a string of battery-operated LED lights inside.

This is mine. The darker blue of the deeper ocean looks very green now. I think the scrunching of the water area adds some interest for when it doesn’t have the lights on.


And with the lights inside

Although they both look interesting with the lit up even in the daytime.


There are lots of interesting things you could do by adding a hidden design that only shows up when lit. You could create a scene on the outside and hide things inside that change the scene when lit. I wonder if you could write a message that would show up when lit. that would be a challenge. I would like to try a thicker cover and see how it works with the lights. I may work this into a short workshop. A fun afternoon or evening making lantern covers.

Posted in Experiments, Resist Felting, Wet felting | Tagged , , | Leave a comment

Wedding Shower Hat Workshop

Last weekend I got to teach a workshop for the first time since covid hit. I have really missed teaching. I was contacted to teach a wet felted hat class for a bride-to-be. She wanted to do something different than the traditional bridal shower. Everyone was vaccinated and we all wore our masks. It was a lot of fun.

Everyone picked their colours from The Olive Sparrow (https://www.etsy.com/ca/market/the_olive_sparrow) and I ordered them in. I have to say the wool arrived quickly and nicely packaged with labels. I point this out because I have ordered from other places and received a mixed bag of fibres and I was left to sort out what the colours were and prep it for class. All the embellishment fibres were from my own stash.

Everyone picked the style they wanted from the hat samples I brought. Then they grabbed their wool and we started. I like to do 3 layers for hats. With the most shrinkage being around and with the resist we used it leaves room at the top for shaping.

Once the first side was laid out it was time to embellish. picking out the fibres and seeing how they look is always lots of fun.

Don’t forget to take a picture so you can embellish the other side.

Then the hard work begins rubbing and rolling.

After much rubbing and rolling, it was time to remove the resist.

And now they try them on and wonder how they are ever going to make them fit.

Much more rolling and fulling later the hats are shaped and ready to take home and dry. Sorry I got no pictures of that part.

All in all, it was good to teach again and the ladies were great to work with. I think we all had a lot of fun. I need to thank Sabrina( the gracious hostess) for her pictures of the day or they would be sparse. I think she is happy with her hat. 🙂


Posted in classes, Hats, Wet felting | Tagged , , | Leave a comment